本博客由科研AI Agent实验室BenszResearch强力驱动!如何更快地访问本站?有需要可加电报群获得更多帮助。本博客用什么VPS?创作不易,请支持苯苯!推荐购买本博客的VIP喔,10元/年即可畅享所有VIP专属内容!
概览
- 本文围绕 作者的主要精力还是放在原生frp程序里 展开详细讨论
- 涵盖 用最官方的方法来使用frp 等核心内容
- 包含 115 个主要章节内容
- 文末提供总结与展望
前言
前不久我出过一期《Docker系列 通过FRP实现内网穿透》讲述怎么利用FRP进行内网穿透。不过,经过测试,很快我发现此文有相当大的局限性,列举如下:
- 仅限
x86架构的机器/VPS可以使用 - 不是官方维护的镜像,很难获得开发者的支持
但是,frp开发者对于Docker镜像的态度比较随意,这对于使用Docker的用户来不太友好。其实fatedier/frps的Docker镜像估计也是可以用的,不过我不准备折腾了。因为我感觉作者的主要精力还是放在原生frp程序里。所以我们干脆就用最官方的方法来使用frp!我看了一下Github的README文档,也不是很难。下面我们用新的方法再安装一次frp吧!
这个教程可以支持frp所支持的所有架构/系统类型,可以放心食用。如果你是高级用户,可以直接在Github Repo了解如何进行更加细致的设置。
除frp外,Cloudflare 隧道内网穿透(比如此教程)也是一种比较常见的方案,不要求你具有一个用于布署服务端frp的VPS。感兴趣的小伙伴可以自己试试看 (~ ̄▽ ̄)~
原理
FRP的基本原理大致如下:
- 在一个有公网ip的VPS中搭建frp server(frps)服务。将域名
test.sample.com解析到VPS里。 - 给frps开放某些特定的端口,比如
1234 - 在本地电脑安装frp customer(frpc)服务。通过
common系列参数保证frps-frpc的通信正常。 - 本地某服务上线,比如
localapp:6534。 - frpc进行内部连接,比如
frpc:1234 - 穿透路线:
test.sample.com→VPS→frps:1234→frpc:1234→localapp:6534
按下面的步骤走,你就能深切地体会到原理对应的具体的命令行操作。
准备工作
如果想要降低失败率,你需要较好地掌握Linux基础,特别是与用户(组)相关的知识。如果你不太会Linux,你可以试一下本教程,有问题可加Telegram群或评论区提问。
域名解析
你需要提前将待用域名解析到VPS(frps端)的公网ip中。在本章的示范中,需要用到以下域名:
- frps.sample.com:用于访问服务器端的frps。
- httptest.sample.com:用于验证http内网穿透是否生效
如果你还需要https,还需要:
- httpstest.sample.com:用于验证https内网穿透的是否生效
提前申请并下载好httpstest.sample.com的SSL证书,即下文的httpstest.sample.com.pem、httpstest.sample.com.key。
frp版本
frp不同版本所使用的软件是不同的。在frp的Github Repo中,你可以看到最新的版本:
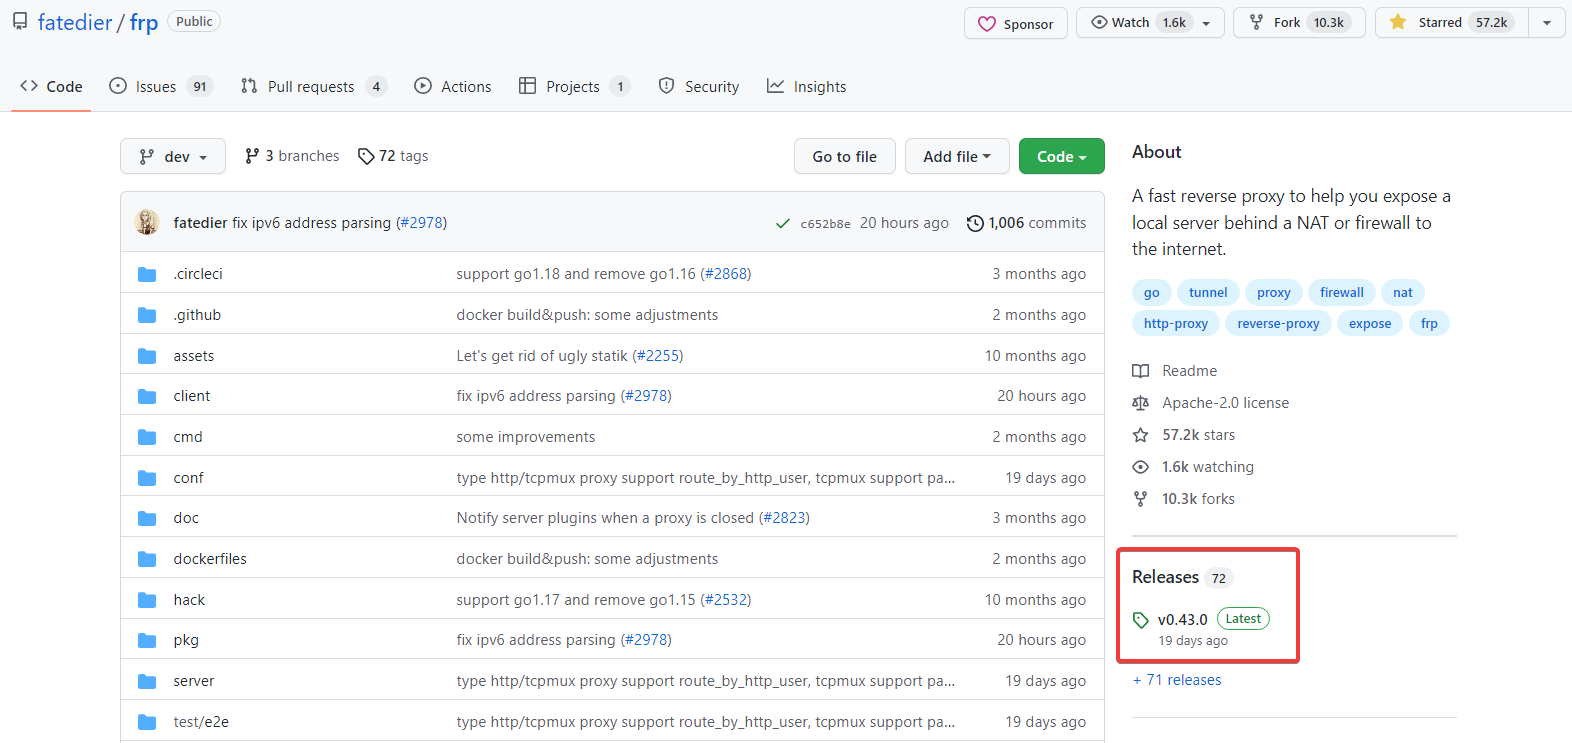
点进去后,你要根据自己的VPS/本地设备的架构/系统来下载软件:
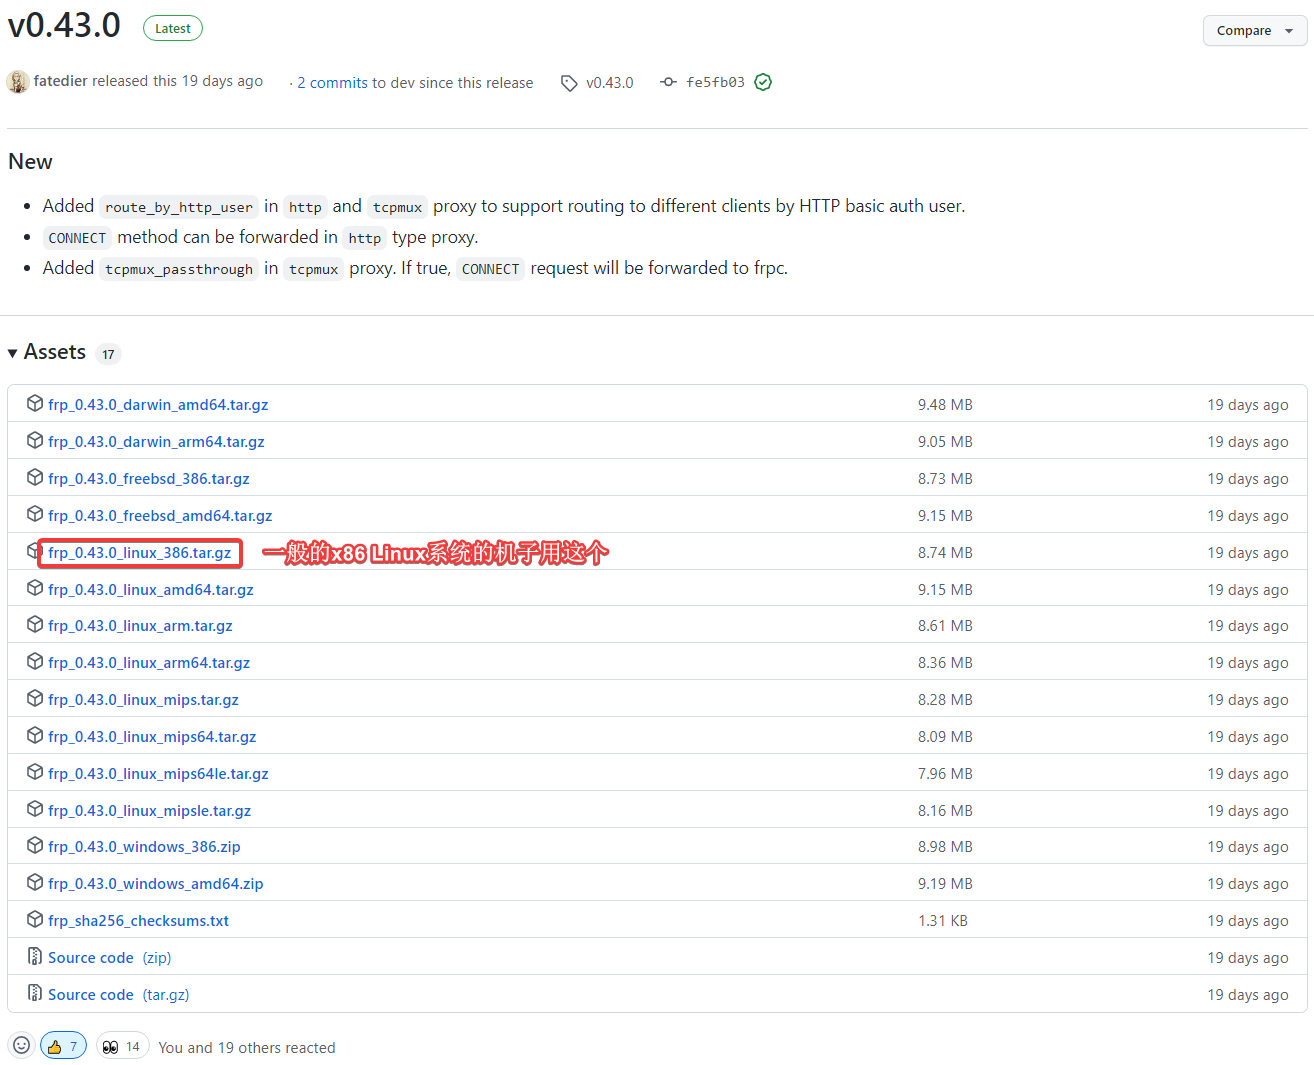
如果你不知道自己的机子是什么架构,可以用uname -a来查看。有问题加群或评论区提问。
服务端
配置ini文件
首先,创建工作目录:
work=~/Downloads/frp
创建并进入目录:
mkdir -p $work && cd $work
下载软件(不同CPU架构要选不同的版本)。或者你也可以在电脑下载,然后通过sftp上传到工作目录。
wget https://github.com/fatedier/frp/releases/download/v0.43.0/frp_0.43.0_linux_386.tar.gz
解压tar.gz文件:
tar zvfx frp_0.43.0_linux_386.tar.gz && mv frp_0.43.0_linux_386/* . && rm -r frp_0.43.0_linux_386/
此时文件夹的内容类似于:
$ ls -hl
-rw-rw-r-- 1 test_user test 8.8M May 27 16:35 frp_0.43.0_linux_386.tar.gz
-rwxr-xr-x 1 test_user test 9.8M May 27 16:31 frpc
-rw-r--r-- 1 test_user test  11K May 27 16:35 frpc_full.ini
-rw-r--r-- 1 test_user test  126 May 27 16:35 frpc.ini
-rwxr-xr-x 1 test_user test  13M May 27 16:31 frps
-rw-r--r-- 1 test_user test 5.5K May 27 16:35 frps_full.ini
-rw-r--r-- 1 test_user test   26 May 27 16:35 frps.ini
-rw-r--r-- 1 test_user test  12K May 27 16:35 LICENSE
修改frps.ini的内容。主要是对端口号、帐号和密码、token进行一定改动。大家注意中文注释对应的参数。
vim ./frps.ini
填入以下内容。如果你是高级用户,你可以根据frps_full.ini自己进行调整。小白用户不妨直接基于我写好的配置进行改动(注意中文标注的相应参数,推荐自定义,不要用我的默认值)。
[common]
# A literal address or host name for IPv6 must be enclosed
# in square brackets, as in "[::1]:80", "[ipv6-host]:http" or "[ipv6-host%zone]:80"
# For single "bind_addr" field, no need square brackets, like "bind_addr = ::".
bind_addr = 0.0.0.0
# 按需修改。默认bind_port = 7000
bind_port = 6500

# udp port to help make udp hole to penetrate nat
# 按需修改。默认bind_udp_port = 7001
bind_udp_port = 6502

# udp port used for kcp protocol, it can be same with 'bind_port'
# if not set, kcp is disabled in frps
# 按需修改。默认bind_port = 7000
kcp_bind_port = 6500

# specify which address proxy will listen for, default value is same with bind_addr
# proxy_bind_addr = 127.0.0.1

# if you want to support virtual host, you must set the http port for listening (optional)
# Note: http port and https port can be same with bind_port
# 按需修改。默认vhost_http_port = 80, vhost_https_port = 443。但一般VPS的80和443端口都要给Nginx之类的应用来托管。如果你的VPS专门只是用来反代的话,可以使用默认的80和443端口。
vhost_http_port = 6503
vhost_https_port = 6504

# response header timeout(seconds) for vhost http server, default is 60s
# vhost_http_timeout = 60

# tcpmux_httpconnect_port specifies the port that the server listens for TCP
# HTTP CONNECT requests. If the value is 0, the server will not multiplex TCP
# requests on one single port. If it's not - it will listen on this value for
# HTTP CONNECT requests. By default, this value is 0.
# tcpmux_httpconnect_port = 1337

# If tcpmux_passthrough is true, frps won't do any update on traffic.
# tcpmux_passthrough = false

# set dashboard_addr and dashboard_port to view dashboard of frps
# dashboard_addr's default value is same with bind_addr
# dashboard is available only if dashboard_port is set
dashboard_addr = 0.0.0.0
dashboard_port = 6501

# dashboard user and passwd for basic auth protect
# frps后台的用户名和密码
dashboard_user = superman
dashboard_pwd = test0test

# enable_prometheus will export prometheus metrics on {dashboard_addr}:{dashboard_port} in /metrics api.
enable_prometheus = true

# dashboard assets directory(only for debug mode)
# assets_dir = ./static

# console or real logFile path like ./frps.log
# log_file = ./frps.log

# trace, debug, info, warn, error
log_level = info

log_max_days = 3

# disable log colors when log_file is console, default is false
disable_log_color = false

# DetailedErrorsToClient defines whether to send the specific error (with debug info) to frpc. By default, this value is true.
detailed_errors_to_client = true

# authentication_method specifies what authentication method to use authenticate frpc with frps.
# If "token" is specified - token will be read into login message.
# If "oidc" is specified - OIDC (Open ID Connect) token will be issued using OIDC settings. By default, this value is "token".
authentication_method = token

# authenticate_heartbeats specifies whether to include authentication token in heartbeats sent to frps. By default, this value is false.
authenticate_heartbeats = false

# AuthenticateNewWorkConns specifies whether to include authentication token in new work connections sent to frps. By default, this value is false.
authenticate_new_work_conns = false

# auth token
token = D3YhBv*sD3#*3LrvQX!%tA&r9xHN9N

# oidc_issuer specifies the issuer to verify OIDC tokens with.
# By default, this value is "".
oidc_issuer =

# oidc_audience specifies the audience OIDC tokens should contain when validated.
# By default, this value is "".
oidc_audience =

# oidc_skip_expiry_check specifies whether to skip checking if the OIDC token is expired.
# By default, this value is false.
oidc_skip_expiry_check = false

# oidc_skip_issuer_check specifies whether to skip checking if the OIDC token's issuer claim matches the issuer specified in OidcIssuer.
# By default, this value is false.
oidc_skip_issuer_check = false

# heartbeat configure, it's not recommended to modify the default value
# the default value of heartbeat_timeout is 90. Set negative value to disable it.
# heartbeat_timeout = 90

# user_conn_timeout configure, it's not recommended to modify the default value
# the default value of user_conn_timeout is 10
# user_conn_timeout = 10

# only allow frpc to bind ports you list, if you set nothing, there won't be any limit
allow_ports = 3505-3510

# pool_count in each proxy will change to max_pool_count if they exceed the maximum value
max_pool_count = 5

# max ports can be used for each client, default value is 0 means no limit
max_ports_per_client = 0

# tls_only specifies whether to only accept TLS-encrypted connections. By default, the value is false.
tls_only = false

# tls_cert_file = server.crt
# tls_key_file = server.key
# tls_trusted_ca_file = ca.crt

# if subdomain_host is not empty, you can set subdomain when type is http or https in frpc's configure file
# when subdomain is test, the host used by routing is test.frps.com
# 改成
subdomain_host = frps.sample.com

# if tcp stream multiplexing is used, default is true
# tcp_mux = true

# specify keep alive interval for tcp mux.
# only valid if tcp_mux is true.
# tcp_mux_keepalive_interval = 60

# tcp_keepalive specifies the interval between keep-alive probes for an active network connection between frpc and frps.
# If negative, keep-alive probes are disabled.
# tcp_keepalive = 7200

# custom 404 page for HTTP requests
# custom_404_page = /path/to/404.html

# specify udp packet size, unit is byte. If not set, the default value is 1500.
# This parameter should be same between client and server.
# It affects the udp and sudp proxy.
udp_packet_size = 1500
如果你用了宝塔、ufw等软件,请打开防火墙的相应端口:6500-6504、3505-3510。
创建服务
为了可以比较方便地对这个软件进行管理,我们通过构建Linux Service的方式管理frp。我们创建frps服务:
sudo vim /etc/systemd/system/frps.service
填入以下内容:
[Unit]
Description=frps service
Wants=network-online.target
After=network.target

[Service]
Type=simple
ExecStart=/home/test_user/Downloads/frp/frps -c /home/test_user/Downloads/frp/frps.ini
# ExecStop=
Restart=on-failure # always
KillMode=process
TimeoutSec=120
RestartSec=60

[Install]
WantedBy=multi-user.target
注意:
ExecStart如果有引用文件,应该使用绝对路径ExecStart中的/home/test_user字段代表的是用户home目录。如果你有一个非root用户test_user,一般地你可以使用本例中的/home/test_user。如果你是root用户,要将/home/test_user替换成/root。
管理服务
启动服务:
sudo systemctl start frps.service
查看状态:
systemctl status frps.service
如果成功,有类似下面的日志(有success字样):
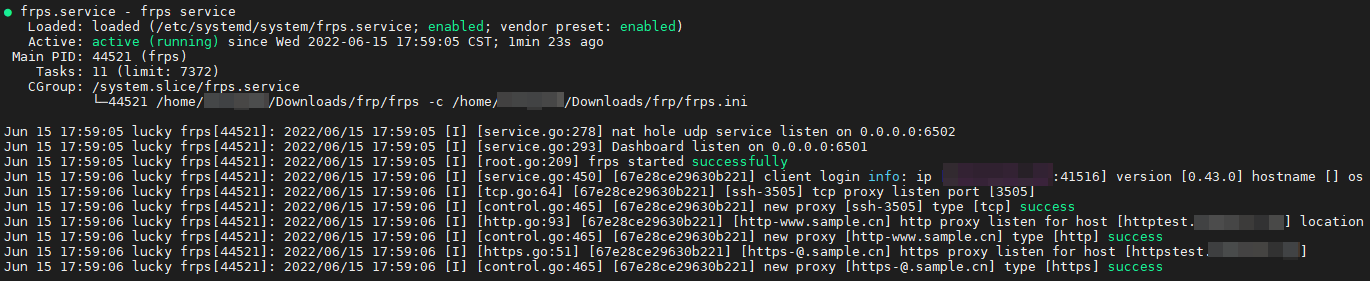
最后,不要忘了设置开机自动启动:
sudo systemctl enable frps.service
其它常用的命令还包括:
- 重启服务:
sudo systemctl restart frps.service
- 停止服务:
sudo systemctl stop frps.service
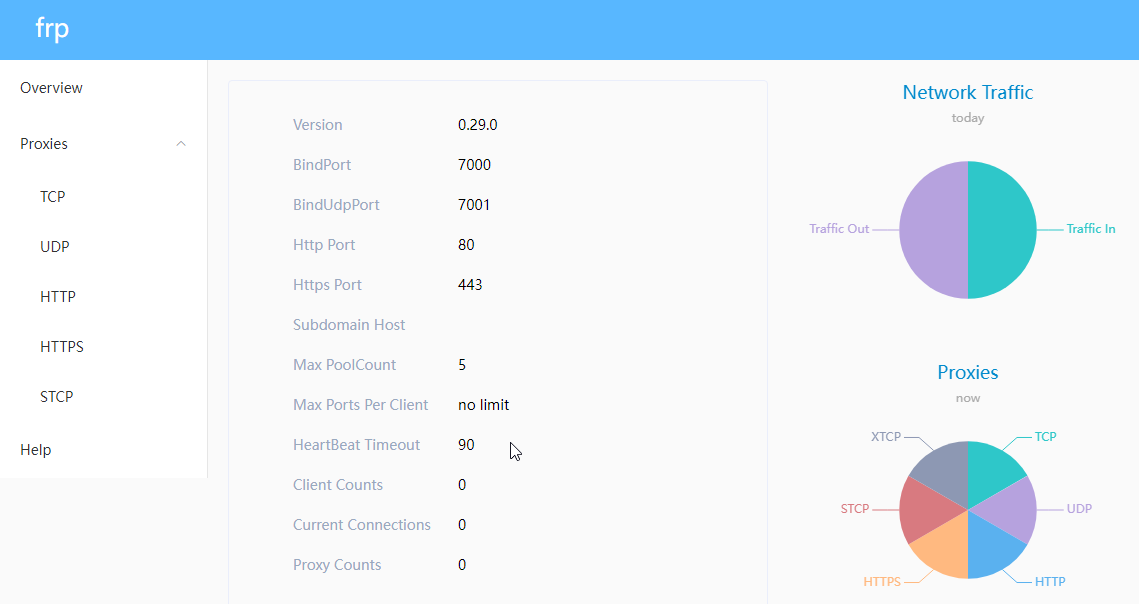
当然,你也可以访问frps的dashboard:http://frps.sample.com:6501。帐户/密码是:superman/test0test。
本地端
本地端的创建很多原则和服务端是一致的,比如用户目录的设置。大家注意按需修改
如果你用了宝塔、ufw等软件,请打开防火墙的相应端口:3505-3510。
测试
这部份和之前的教程是一样的,没有区别。
SSH
你在自己的Shell终端里测试一下即可:
- 地址:frps.sample.com
- 端口号:3505
- 帐户:<自己的帐户>
- 密码:<自己的密码>
HTTP
访问http://httptest.sample.com:6503可成功访问应用。
HTTPS
访问https://httpstest.sample.com:6504可成功访问应用。
小结
这个教程还是蛮顺的,使用时注意一下用户名/用户组的设置就行了。另外,我觉得端口、用户名/密码、Token这些信息大家最好不要用默认的,自己改动一下,测试一下,以加深对frp的理解。FRP的内网穿透服务还是很稳定的。除了FRP外,Cloudflare Tunnel也是一种比较流行内网穿透方案。感兴趣的小伙伴可以看看这篇文章。希望大伙们使用愉快喽!
扩展阅读
- Cloudflare Tunnel 免费内网穿透 | EdNovas 的小站
- Gihub: https://github.com/fatedier/frp
- How To Access Your PCs and Servers from Anywhere Using Guacamole and Cloudflare Tunnels – YouTube
- Remote Access to CasaOS (and Apps) via Cloudflare Tunnels – YouTube
- Kasm Workspaces + Cloudflare Tunnels = Access Kasm Workspaces from ANYWHERE! (Episode 3) – YouTube
---------------
完结,撒花!如果您点一下广告,可以养活苯苯😍😍😍

博主有没有遇到过,配置 frp 后,连接不稳定的问题。
具体地:我用 azure CN 服务器做的中间服务器,穿透了实验室的 gitlab 和 ssh
但是每次隔一段时间去连接 ssh 都会卡住,需要刷新几次 gitlab 页面,直到页面出来了,ssh 才能用。
不确定是 服务器 的问题,还是 frp 的设置问题。。。
有可能是服务器带宽或性能限制。可以想办法监测一下vps的性能占用。
Cloudflare 隧道内网穿透(比如此教程) 链接失效。这个不错。
现在常用网站地址 多重方式访问。感觉稳定了。我用的都是免费frp,付费的自建的感觉太贵。虽然更安全可控。
除了frp应该还有其它方案。我是不太积极的,因为我没有这方面的需求 (ฅ´ω`ฅ)
谢谢教程,顺利部署~
祝顺利(~ ̄▽ ̄)~